Brokers
Different brokers have different export options so on this page you will find instructions for some of the brokers supported by TradeNote.
Export instructions are written with the help other TradeNote users in the community. Contact me if you want to contribute as well.
You contact me via Discord if you wish to integrate your broker.
Currently, Tradenote supports the following brokers:
- TradeZero
- Interactive Brokers
- TD Ameritrade thinkorswim
- TradeStation
- Tradovate
- MetaTrader 5
- HeldenTrader Pro
- Rithmic
- FundTraders
- NinjaTrader
- TopstepX
- Alternatively, you can use the template and adapt it to your export file.
Based on current code, TradeNote require export files to have certain type of information (side (opening vs closing trade), execution time, etc.). Because of this limitation, it currently cannot support certain brokers. You can eventually try and adapt the export file template.
- Webull
- TradingView export
- Optimus Futures
- Binance
- DAS Trader Pro
Community members have also created custom scripts to convert export files to fit the template in custom scripts.
Template
If you wish to adapt your export file to the template, below is the explanation for each of the columns. Note : make sure to input one execution per line, not aggregated trade. So one line = one execution
- Account: your accound id or name
- T/D: trade date in MM/DD/YYYY format
- S/D: settlemennt date in MM/DD/YYYY format
- Currency: currency applied to the price of symbol
- Type: must be of type "stock", "future", "forex", "call" or "put"
- Side: side of the execution
- B: Buy
- S: Sell
- SS: Short
- BC: Buy cover
- Symbol: symbol
- Qty: number of shares executed
- Price: price of symbol
- Exec Time: trade time in HH:mm:ss format
- Comm: commissions. Must be a positive number
- SEC: SEC fees. Put 0 if not applicable
- TAF: TAF fees. Put 0 if not applicable
- NSCC: NSCC fees. Put 0 if not applicable.
- Nasdaq: Nasdaq fees. Put 0 if not applicable
- ECN Remove: not applicable. Put 0
- ECN Add: not applicable. Put 0
- Gross Proceeds
- Net Proceeds: gross proceeds minus commissions and fees
- Clr Broker: not applicable. Leave blank
- Liq: not applicable. Leave blank
- Note: not applicable. Leave blank
TradeZero
- Ling to the portal and click My Account.
- Click Account Overview from the dropdown.
- Once into account stats, click on the Trades tab.
- Set the start and end dates you wish to export, then click Search.
- Just above the list of trades click and save the CSV
Interactive Brokers
- Login to the Portal
- Select the Performance & Reports tab (top of the page, under the Search Box)
- Select Flex Queries
- There are 2 options available, Activity Flex Query and Trade Confirmation Flex Query.
- We are interested in the Trade Confirmation Flex Query
- Under the Trade Confirmation Flex Query panel, click the Create, +, button.
- At the Create Trade Confirmation Flex Query page, select the following options
- Trade Confirmation Flex Query Details: Provide a Query Name (ex. TradeNoteExport)
- Sections
- Click Trade Confirmation and only select Executions
- From there, you can either
- Check the following boxes manually: Account ID, Date/Time, Settle Date, Currency, Underlying Symbol, Symbol, Buy/Sell, Quantity, Price, Commission, Code, Broker Execution Commission, Broker Clearing Commission, Third-Party Execution Commission, Third-Party Clearing Commission, Other Commission, Proceeds, Net Cash, Trade ID, Order ID, Asset Class, Multiplier, Put/Call
- Or execute the following script using your browser's DevTools console:
jsconst fields=["Account ID","Date/Time","Settle Date","Currency","Underlying Symbol","Symbol","Buy/Sell","Quantity","Price","Commission", "Code", "Broker Execution Commission","Broker Clearing Commission","Third-Party Execution Commission","Third-Party Clearing Commission","Other Commission","Proceeds","Net Cash","Trade ID","Order ID","Asset Class","Multiplier","Put/Call"],container=document.querySelector('tbody[class="ui-sortable"]'),trs=container.querySelectorAll("tr");trs.forEach(e=>{let r=e.querySelectorAll("td"),t=r[1].childNodes[0].textContent;if(fields.includes(t)){let i=e.querySelector('input[type="checkbox"]');i.click()}}); - Scroll to the bottom of the dialog and select Save
- Delivery Configuration
- Models: Optional
- Format: CSV
- Include header and trailer records?: No
- Include column headers?: Yes
- Include section code and line descriptor? No
- Period: Today (or any other option)
- General Configuration
- Date Format: yyyyMMdd
- Time Format: HHMMSS
- Date/Time Separator: ;(semi-colon)
- Include Canceled Trades?: No
- Include Audit Trail Fields?: No
- Display Account Alias in Place of Account ID?: No
- Select Continue
- On the Review Your Trade Confirmation Flex Query page, click Save Changes
- On the Trade Confirm Flex Query Saved page, click Ok
- Notice your new Flex Query is now available under the Trade Confirmation Flex Query panel
- Use the Run (right arrow icon) to generate a new report
- In the TradeNoteExport (name of your Flex Query) dialog, select
- Period: < Your desired date range >
- Format: CSV
- Click Run
- At this point, your file should be downloaded and available to use
Cleanup before importing to TradeNote (optional) Before attempting to import data, there are a few things that may help.
- Remove any empty lines that may be present in your CSV file
- If multiple accounts are present, isolate them to 1 account at a time
- If trading options, futures, etc., ensure the Underlying Symbol exists
- May need to set the Underlying Symbol as the ticker from the Symbol column
- Sort the trades by Order Time
- Remove any Open Trades
- Add an Order Time to Expired Contracts rather than leaving the fields empty
- Format prices to 2 decimal places to prevent dealing with floating point precision errors
TD Ameritrade thinkorswim
Please use the standalone thinkorswim application and follow the steps below.
- Navigate to the "Monitor" tab, then "Account Statement" tab.
- From "days back from today" dropdown, filter the date range.
- From "Transactions" dropdown, select "Trades" and deselect all others.
- From the top right corner (underneath "OnDemand" button), click the Actions menu (3-dashes) and "Export to file".
- Save the .csv file to your desktop.


In some cases you may see the following message on import
ERROR IN UPLOAD FILE No matching execution in Account Trade History for execution in Cash Balance on xx/xx/xx xx:xx:xx. Please correct your file manually and upload it again.
The way the import code works is that it looks for matching executions in two tables : Account Trade History and Cash Balance. The code matches these executions by date and time. However, there is a bug in TD where certain matching executions have one or two seconds time difference. You need to look for those time differences and change them manually.
TradeStation
- Select the "Orders" tab at the bottom of the TradeManager window in TradeStation.
- Choose "Filled Orders" from the "Status" drop-down menu at the top of the screen.
- Press the "Retrieve Orders" button after entering the date range that you want to import.
- Sort by Filled/Canceled orders in ascending order (e.g., oldest first) by changing the sort order.
- Select "Copy" by right-clicking after clicking (ticking) the upper-left "square" right beneath "Symbol Filter" label.
- Paste the transactions into the text box in TradeNote.
Note: currently, TradeNote does not take into account ECN fees (available soon).
Tradovate
- click on the Account tab, then choose the account to export.
- select "Orders".
- Select time window of history data.
- Download as CSV.
MetaTrader 5
Please use the standalone MT5 windows application and follow the steps below. Also, make sure to set the MT5 language to English before exporting the trades. In the MT5 main menu at the top go to View -> Languages and select English.
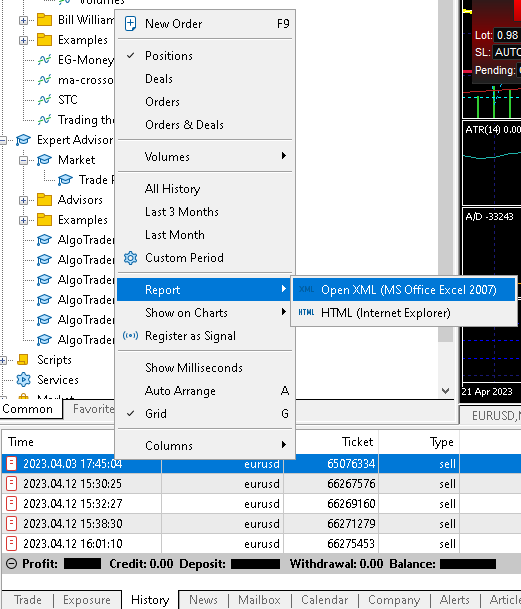
- In the MetaTrader Terminal window, select the History tab.
- Right-click on any order in the account history, and select the time period you want to export.
- Right-click on any order in the account history, and select Report.
- Save the report as an "Open XML (MS Office Excel 2007)" file to your desktop (or anywhere else - just remember where you put it).
HeldenTrader Pro
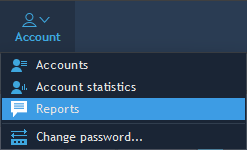
- In the upper section of the application select the "Account" button.
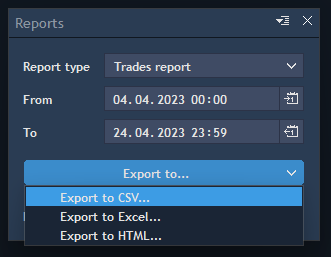
- In the dropdown menu select "Reports" and a new window "Reports" will appear.
- Select in the "Report type" dropdown menu - "Trades report".
- Select the timeframe you want to export in the "From" - "To" dropdown menu. One export file can contain one or more trading days/weeks.
- Select "Export to CSV".
Rithmic
- Login to RTrader Pro
- Open Order History (step1.webp)
- Reset Order History to original template (step1.1.webp)
- Select your Account and the date you want to export (step2.webp)
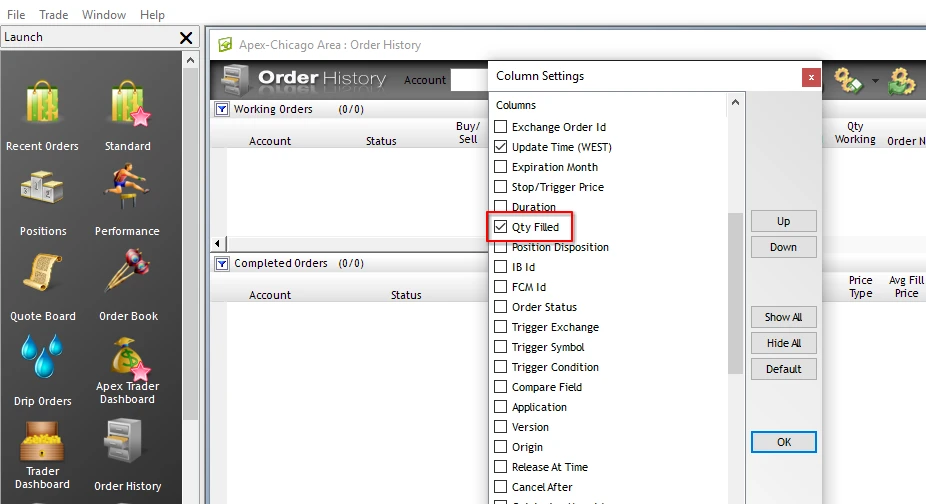
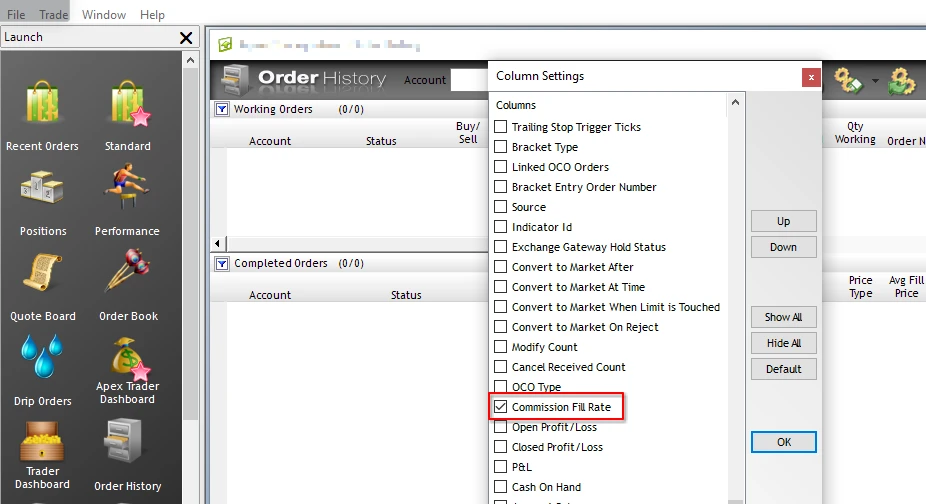
- Adjust the reporting by adding the columns "Qty filled" and "Commission Fill Rate" (DO NO CHANGE SORTING OF THE COLUMNS) (step3.webp ; step4.1.webp ; step4.2.webp )
- Sort the Orders ascending (first order on top) (step5.webp)
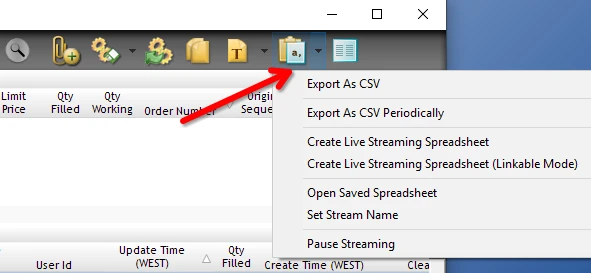
- Export As CSV (step6.webp)
optional Steps
You can create a separate template so that the steps do not have to be carried out for every export.
- Save the report via "Save with a name..." (step7.webp)
- Then you can open the template with a simple click on the Sidebar (step8.webp)
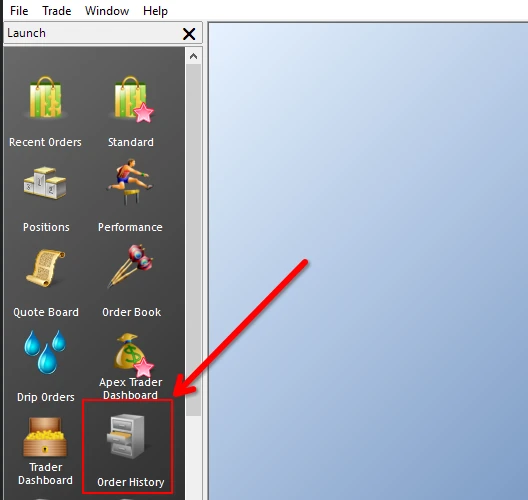
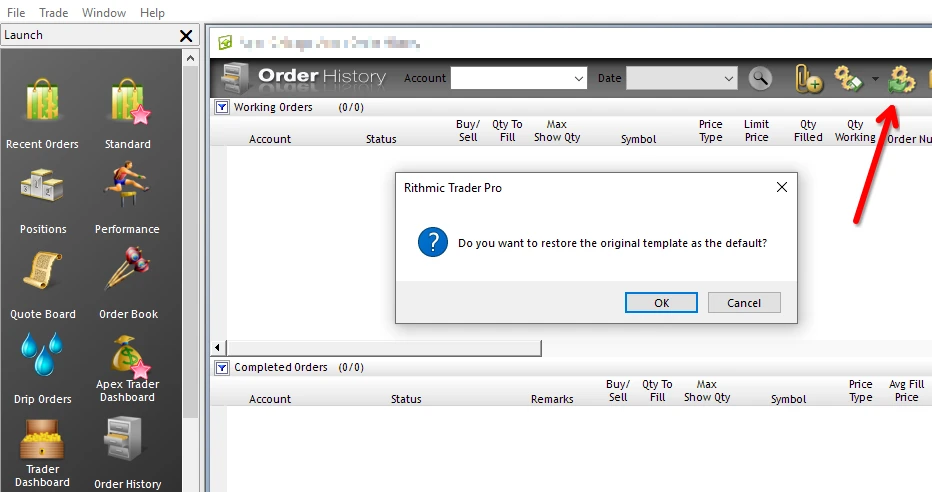
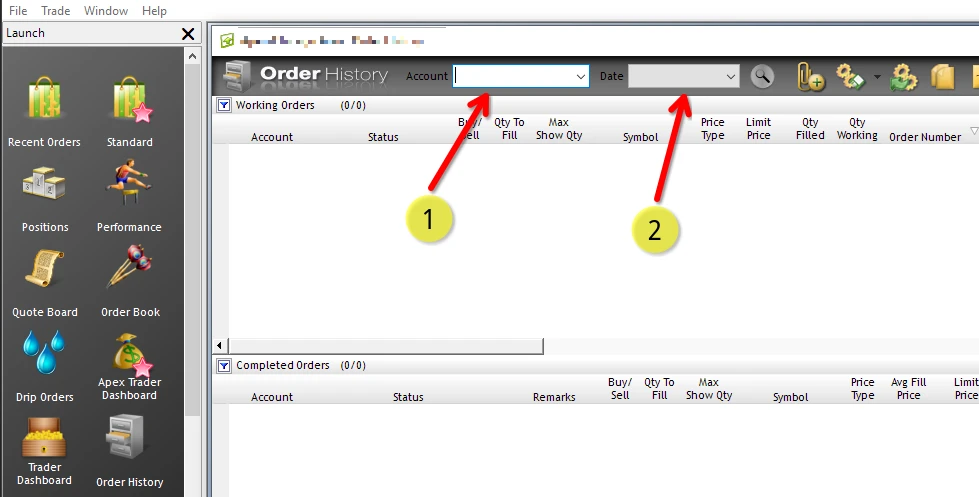
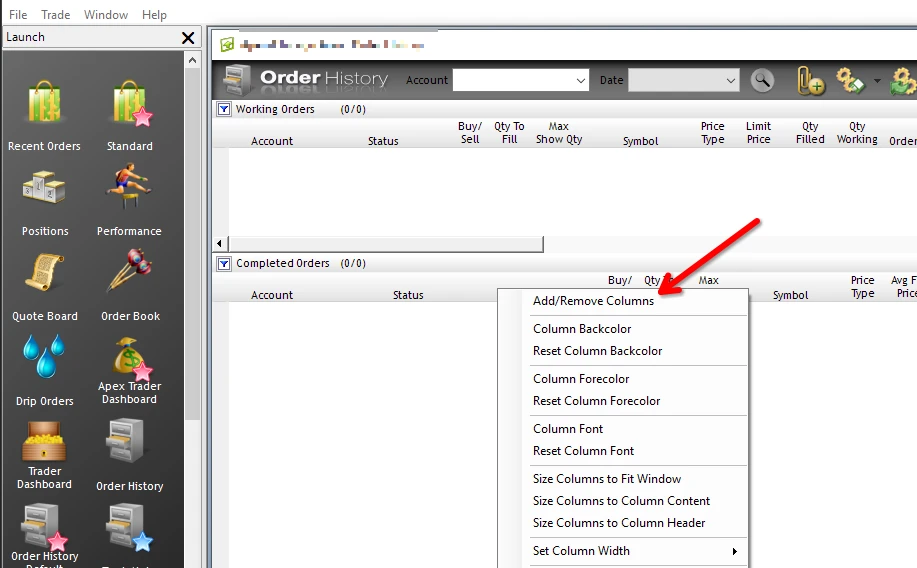
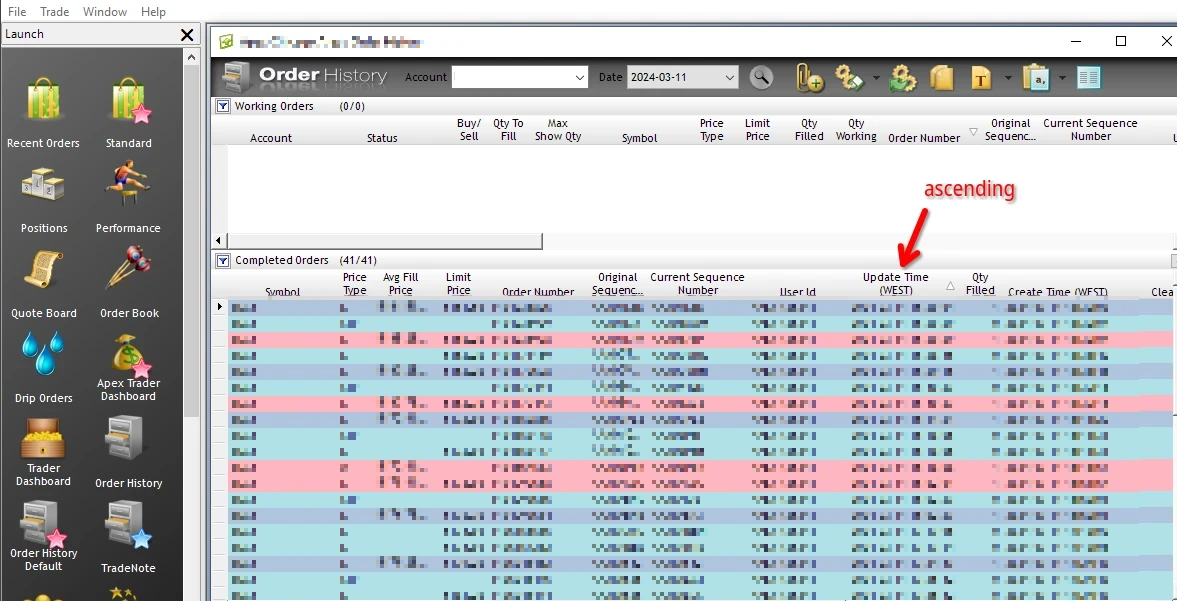

Please note that trades need to be ordered in ascending order
FundTraders
- Login to your account
- Click Reports on the left pane
- Click Trade History
- Click View Report
- Click download as csv
NinjaTrader
- In the NinjaTrader 8 Control Panel Window, select New, and choose Trade Performance.
- In the top right corner of the Trade Performance window, choose the date(s) you would like to export. To export a single day, please ensure both fields reflect the same day you wish to export.
- Click the 'funnel' icon in the top left of the Trade Performace window, and ensure only the account you wish to export is selected.
- Next, change the "Display" dropdown menu to "Executions".
- In the Trade Performance window, click the "Generate" button in the top right corner.
- Right-click anywhere in the output window, and choose "Export".
- Next, change the "Save as type" field to "CSV (*.csv).
- Finally, click "Save". Your exported file will save to the location specified
TopstepX
- Login to TopstepX account.
- Click the Orders component.

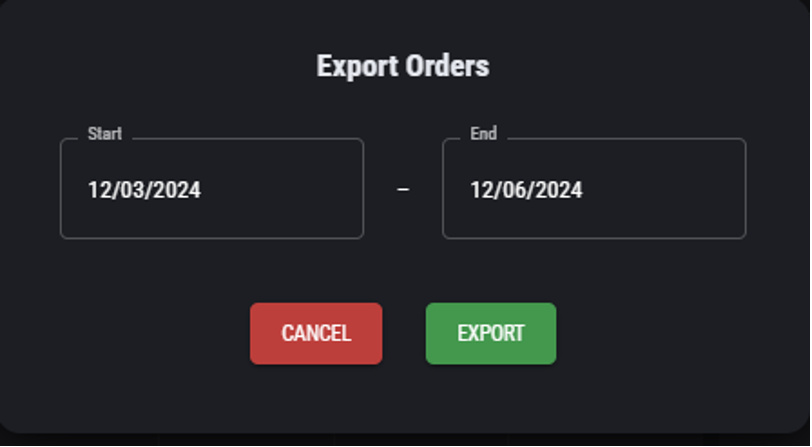
- Click export.

- Select date range and click Export.
